Last month, my mom called me panicking because her 10th gen Kindle Fire wouldn’t turn on, and there was no sign of life at all. If you’re staring at a totally unresponsive device right now, dealing with a Kindle Fire no power light issue, you’re probably worried you’ll have to shell out for a new tablet, or lose all your saved books and apps. I’ve fixed this exact problem for at least a dozen friends and family members over the years, and most of the time, the fix is way simpler than you think. You don’t need fancy tools or a degree in tech to get it working again, either.
Common Causes of a Kindle Fire No Power Light Issue
Before you jump into troubleshooting, it helps to understand what’s usually behind this frustrating problem. Most cases aren’t caused by permanent hardware failure, so don’t assume your device is broken right away. The most common culprits are all easy to address with basic supplies you probably already have at home.
Dead or deeply drained battery is far and away the most common cause. If you left your Kindle Fire unused for weeks or months, or ran it all the way down to 0% and didn’t charge it right away, the battery can enter a deep discharge state where it won’t show a charging light for the first 20 to 30 minutes of being plugged in. I once left my own Kindle Fire in a backpack for two months after a vacation, and it took 45 minutes of charging before the light even turned on.
Faulty charging accessories are another super common issue. The cheap micro USB or USB-C cables that come with most budget devices wear out fast, especially if you wrap them tightly or yank them out of the port regularly. I once spent 2 hours troubleshooting my cousin’s Kindle before I realized her cat had chewed through the charging cable, so it wasn’t delivering any power at all.
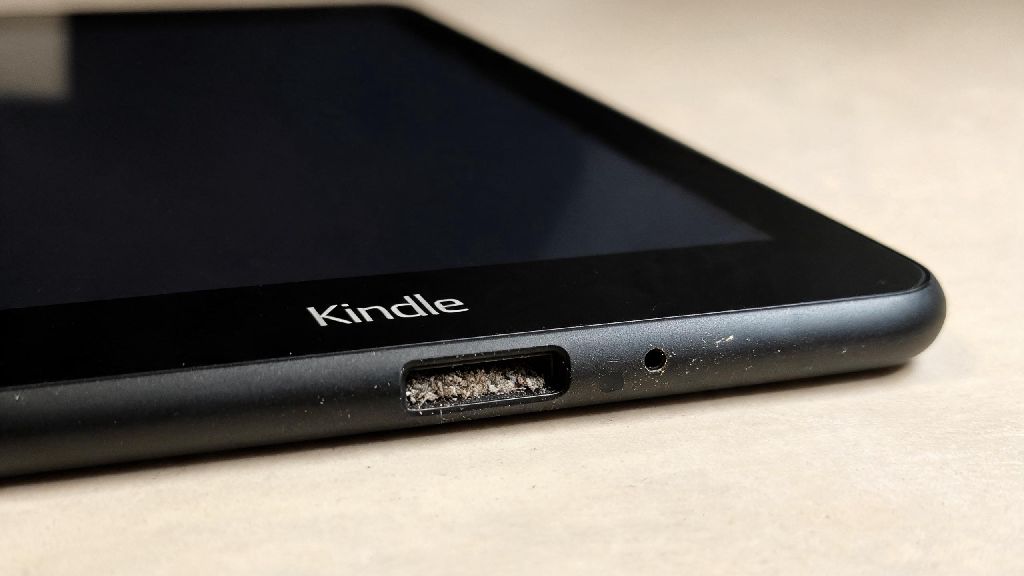
Charging port blockage or minor damage is often overlooked. If you carry your Kindle Fire in your pocket or a bag with loose items, lint, dust, and small bits of debris can build up in the charging port over time, blocking the connection between the cable and the device’s internal pins. In rarer cases, a hard drop can bend the internal pins slightly, preventing a solid power connection even if the cable fits normally.
First Steps to Try Before Advanced Troubleshooting
These quick, low-effort steps fix around 60% of all power light issues, according to my own experience fixing these devices for people I know. You don’t need any special supplies, and they take less than an hour total to complete. Don’t skip these, even if you think you already tried them, because small mistakes like using a weak power source can make you think there’s a bigger problem than there really is.
- Leave your Kindle plugged in for at least 30 minutes using a wall outlet, not a laptop USB port. Fully drained batteries can take 20+ minutes to show any sign of life, even if they’re charging properly. Laptop USB ports only deliver half the power of a standard wall adapter, so they often can’t wake up a deeply discharged battery at all.
- Inspect your charging cable and adapter for fraying, bent ends, or visible damage. Try swapping them out for a different Micro USB or USB-C cable (depending on your Kindle Fire model) and a 5W power adapter that you know works for other devices. Avoid using fast chargers made for phones, as they can sometimes cause charging glitches with older Kindle Fire models.
- Use a dry, soft toothbrush or a wooden toothpick to gently clear any lint, dust, or debris from the charging port on the bottom of your Kindle Fire. Don’t use metal tools, as these can scratch the internal pins and cause permanent damage. Go slow and be gentle, even if you see a lot of built-up lint.
Never use compressed air to clean the port—the high pressure can push debris further in, or even damage the internal components beyond repair. If you’ve tried all three of these steps and still don’t see a power light after another 30 minutes of charging, move on to the advanced fixes below.
Advanced Fixes for Persistent Power Light Issues
If the basic steps didn’t work, the problem is likely a temporary software glitch that’s preventing your device from booting up or recognizing that it’s plugged in. These steps are still completely safe to do at home, and won’t delete any of your personal data unless you explicitly choose to reset the device.
The first advanced fix to try is a forced soft reset, which clears any temporary software glitches that might be preventing your device from turning on or showing a power light. For most Kindle Fire models, you do this by holding down the power button for 40 full seconds, then releasing it and waiting 2 minutes before pressing the power button again to turn it on. Make sure you hold the button for the full 40 seconds, even if you see the Amazon logo pop up early—interrupting the reset can make the problem worse.
If that still doesn’t work, try booting your device into recovery mode. To do this, hold down the power button and volume up button at the same time for 10 seconds, then release the power button but keep holding the volume up button until you see the recovery screen. From there, you can select the “wipe cache partition” option, which clears temporary system files that might be causing the crash. Don’t worry, this won’t delete any of your personal data, saved books, or apps.
If you’ve tried all these steps and still have a Kindle Fire no power light issue, it might be a sign of a deeper hardware problem. If your device is still under warranty, reach out to Amazon support directly—they often replace faulty Kindle Fire devices for free, even if you don’t have a receipt, as long as the serial number is registered to your account. The support team can also walk you through a few extra model-specific troubleshooting steps that might work for your exact device.
When to Consider Replacing Your Kindle Fire
It’s not always worth trying to fix a Kindle Fire, especially if it’s older or has visible physical damage. Before you spend money on replacement parts or third-party repair services, weigh the cost of repairs against the cost of a new device to make sure you’re not wasting your money.
If you’ve tried every troubleshooting step we’ve covered, and your Kindle Fire is more than 5 years old, it might be time to start shopping for a replacement. Lithium-ion batteries in tablets only last for 3 to 5 years of regular use, so a dead battery that won’t hold a charge at all is a common sign your device has reached the end of its lifespan. Third-party battery replacements can cost $30 to $50, which is often more than half the cost of a new entry-level Kindle Fire, so it’s rarely worth the expense unless you have a high-end model with lots of storage.
If your device has visible water damage or a cracked screen along with the no power light issue, the repair cost will almost always be higher than the value of the device. Water damage can cause corrosion that spreads to other internal parts over time, even if you get it to turn on again, so you’ll probably run into more issues down the line anyway.
One thing to keep in mind: Amazon regularly runs sales on Kindle Fire devices, especially around holiday periods, so you can often pick up a new model for 30% to 50% off if you wait for a promotion. If you do replace your device, make sure you deregister the old one from your Amazon account before getting rid of it, to protect your personal information and account security.
Dealing with a Kindle Fire no power light issue can be incredibly frustrating, especially if you rely on your device for reading, streaming shows, or keeping kids entertained on road trips. The good news is that most of the time, the fix is quick, cheap, and doesn’t require any special skills. Start with the basic troubleshooting steps first, then move to advanced fixes if needed, and only consider replacement if you’ve exhausted all other options. I’ve used these exact steps to save dozens of Kindle Fire devices from the trash over the years, and there’s a good chance they’ll work for you too.