It’s the worst feeling when you grab your Kindle Fire to finish your favorite book or stream a show before bed, only to plug it in and see nothing. No blinking orange light, no green full charge indicator, nothing. If you’re dealing with a Kindle Fire no charge light problem right now, you’re not alone – this is one of the most common issues users report, and most cases don’t require a trip to a repair shop or a full device replacement. I’ve fixed this exact issue on three different Kindle Fire models for myself and family members over the years, so I’m breaking down exactly what causes it and how to fix it without fancy tools or technical expertise.
Common Causes of Kindle Fire No Charge Light Errors
Before you panic and start shopping for a new device, it helps to understand what’s typically behind this issue. Most causes are surprisingly simple, and you can resolve 70% of cases in 10 minutes or less once you know what to look for.
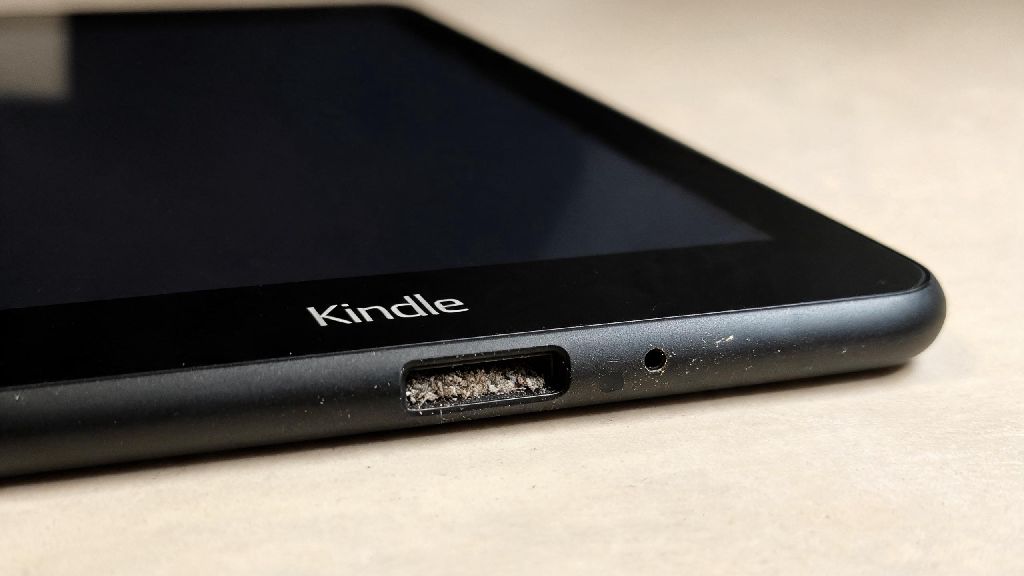
Dirty or blocked charging port is the number one culprit by a wide margin. Lint from your pocket, dust from your bag, or even small food crumbs can build up in the charging port over time, creating a barrier between the cable pins and the device’s internal charging connection. You might not even see the debris unless you hold the port up to a bright light, so don’t rule this out even if the port looks clean at first glance. I’ve had this happen twice after taking my Kindle Fire to the beach – tiny grains of sand got wedged in the port, and I didn’t even notice until I plugged it in and got no light.
Faulty charging cable or wall adapter is the second most common cause. Micro USB and USB-C cables wear out fast, especially if you yank them out of the port regularly or wrap them too tight. Even if the cable works for your phone, it might not deliver enough power for your Kindle Fire, since different devices have different amperage requirements. Cheap off-brand adapters can also fail to meet Amazon’s power specs, so they won’t trigger the charging light even if they’re delivering a small amount of power.
Other common causes include minor system software glitches that prevent the device from recognizing it’s plugged in, a dead or degraded battery that can no longer hold a charge, or a loose internal charging port connection from dropping the device. In very rare cases, water damage can also cause this issue, but that’s far less common than the first three causes we listed.
Quick, No-Tool Fixes to Try First
Start with these simple, zero-cost steps before moving to more advanced fixes. Most people find their issue is resolved with one of these checks, so it’s worth taking 5 minutes to work through them first.
Never use compressed air cans for this step, as they can push moisture further into the port or bend the small internal charging pins if used at too close a range. If you have stubborn lint stuck in the port, you can use a soft plastic dental pick to gently scrape it out, but move very slowly and stop if you feel any resistance.
After you’ve completed these steps, leave your device plugged in for at least 10 minutes before checking for a light. If your battery was completely drained, it can take several minutes for the charging indicator to turn on, even if everything is working properly. Don’t give up after 30 seconds and assume the fix didn’t work.
Advanced Fixes for Persistent Charging Light Issues
If the quick fixes didn’t work, the next most likely cause is a minor software glitch that’s preventing your Kindle Fire from recognizing it’s plugged in. These glitches are super common, especially if you haven’t restarted your device in a few months, and they’re very easy to fix.
The first advanced step is a force restart. For all modern Kindle Fire models, you do this by holding down the power button for a full 40 seconds, then releasing it. Wait 10 seconds, then press the power button again to turn the device back on. This won’t delete any of your books, apps, or personal data – it just forces the device to shut down and refresh its system processes, which is often enough to clear the glitch that’s blocking the charging recognition.
If the force restart doesn’t work, try plugging your Kindle Fire into a powered USB port on your laptop or desktop computer for 30 minutes. Computer USB ports deliver lower power than wall chargers, which can sometimes kickstart a completely dead battery that won’t respond to a full-power wall charger. After 30 minutes, unplug it from the computer and try plugging it back into your regular wall charger to see if the light turns on.
If you can get the device to turn on at any point during these steps, check for pending software updates. Outdated firmware can sometimes cause bugs with charging recognition, and installing the latest update can resolve the issue permanently. I had a 2021 Kindle Fire HD 10 that wouldn’t show a charge light for three days a few months back. I tried all the quick fixes with no luck, but a force restart got it working again immediately, and installing the pending software update kept the issue from coming back.
When to Consider Repairs or Device Replacement
Most of the time, the fixes above will resolve your issue, but there are cases where the problem is related to hardware damage that you can’t fix at home. If you’ve tried all the fixes above and still see no charge light after 24 hours of testing, it’s time to weigh your options for repairs or replacement.
First, check if your Kindle Fire is still under Amazon’s 1-year limited warranty. If it is, contact Amazon support – they will usually replace the device for free, no questions asked, as long as the damage isn’t from accidental drops or water exposure. Many users report getting a replacement device shipped to them in 2 days for this exact issue, so it’s always worth checking your warranty status first.
If your device is out of warranty, you have a few options. You can take it to a local electronics repair shop to have the battery or charging port replaced. A new battery usually costs $30 to $50, and a charging port repair costs $20 to $40. Just make sure the shop offers a 30 to 90 day warranty on their repairs, so you don’t waste money if the issue comes back a week after you pick it up.
That said, if you have an older Kindle Fire model that’s 4 years old or more, replacement is often a better deal than repair. Entry-level Kindle Fire tablets regularly go on sale for under $60, so you might spend less on a new device with a full warranty than you would on repairing your old one. This is especially true if your old device is already running slow or has other minor issues besides the charging light problem.
At the end of the day, a Kindle Fire no charge light problem is rarely a death sentence for your device. Most of the time, it’s a simple fix you can do in your living room without spending a dime. Start with the quick checks first, work your way through the advanced steps, and only look at repairs or replacement if you’ve exhausted all other options. You’ll be back to reading your favorite books and streaming your go-to shows before you know it.